Frequently Asked Questions
Artwork / image / photo submission tips
A. Pixel, or sometimes known as resolution, is the basic unit of measurement for digital images. A high-resolution image will result in a better print quality than a low-resolution image. In a nutshell, printing with low-resolution will result in a blurred print quality, while a high-resolution will result in clearer and sharper print quality.
To check pixel / resolution size of your artwork / image (photo):
- Windows: right click on your file, select "Properties" and look under "Details"
- Mac: right click on your file and select "Get Info"
- Photoshop: choose "Image" and then "Image Size"
The adequate image resolution will vary and will depend on the intended print size. Our online builder will display a message when you have selected an image that is below print requirements.
A. Our online builder accepts files in .jpg, .bmp, .tif, .png, and .gif.
A. If the image file that you uploaded does not fit our card properly and you want to resize it to fit our requirements (shown on the right hand side of our card maker just below the big red "upload images" button), you can either resize it on your own computer's image editing software or if you don't have this available, you can resize them using online image editing tools such as http://www.picresize.com.
A. Yes, our online builder and printing capabilities support back and white and sepia images, as well as artwork designed on Paint or other graphic-design software.
A. You can upload your images straight from your computer via the upload feature located in the product page. If you do not have a digital image and need to have an image scanned, then please see below for scanning tips.
A. Yes you can use scanned images and for optimal quality please ensure the following:
- Wipe your scanner bed to remove dust and particles
- Scan original copy for optimal clarity (and not a copy version)
- Glossy photos have a better scan quality than matt
- Set the scan at 300 dpi
A. The following is a list of images (photos) that DO NOT generally reproduce well:
- Out-of-focus or blurred
- Severe exposure issues (too dark or too light)
- Have been altered or cropped
- Scanned under 300 dpi
- Shared/stored images from public websites
- Images sent back and forth via email
- Cell-phone images (unless the camera is 5 mega pixels or above)
A.
Safe Area
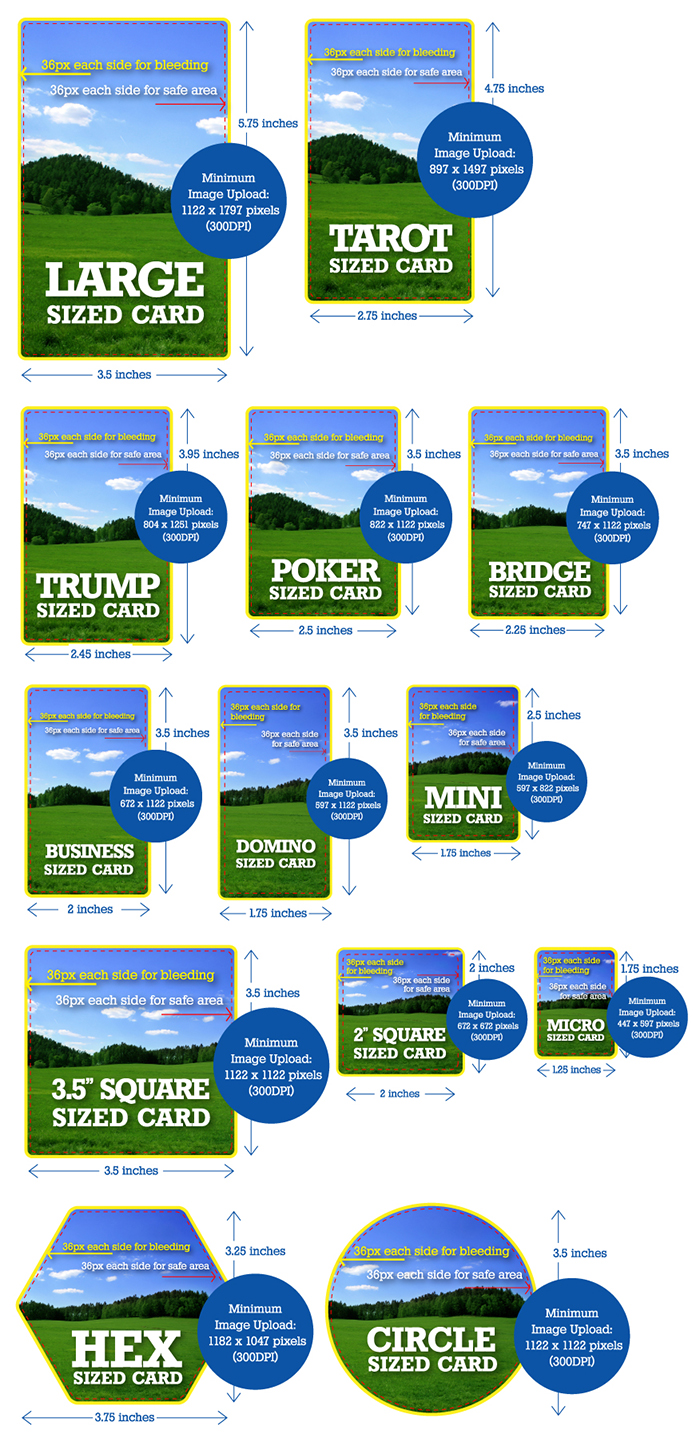
The Safe Area is highlighted with a red dotted line and is 36 pixels each side based on a 300DPI image. Keep text and other important parts of your design, image, or photo inside the Safe Area! During the production of your product, some of the content outside the safe area may be cut off. Everything inside the safe area will be preserved. Note that the red dotted line will not be printed but for your reference only.

Poker size cards
The actual printed size is 2.5" x 3.5" and the minimum image upload size requirements are 822 x 1122 pixels (300DPI).
Bridge size cards
The actual printed size is 2.25" x 3.5" and the minimum image upload size requirements are 747 x 1122 pixels (300DPI).
Large size cards
The actual printed size is 3.5" x 5.75" and the minimum image upload size requirements are 1122 x 1797 pixels (300DPI).
Tarot size cards
The actual printed size is 2.75" x 4.75" and the minimum image upload size requirements are 897 x 1497 pixels (300DPI).
Mini size cards
The actual printed size is 1.75" x 2.5" and the minimum image upload size requirements are 597 x 822 pixels (300DPI).
Print bleeding
To accommodate for print bleeding (yellow border area on image), there is an additional 72 pixels removed from each dimension (36 pixels each side based on a 300DPI image), therefore you will see 36 pixels cut off each side of your images that you upload. If your image upload is 900DPI, then the bleeding area for each side would multiply to 108px (3x36px). This is industry practice to allow printing to the edge without seeing inconsistent white gaps.
Simple answer
Basically, please keep everything you want printed inside of the red dotted lines. There is a small chance that anything in the gap between the yellow border and red dotted line to be cut off during production.
A. Yes you can easily store your artwork and images on our website inside your photo library. After uploading, please click on
 button located at the top (and bottom) of the page to save them into your photo library, a space we have created for your convenience.
You can save your project and return to it later by clicking on the "save" button
 located at the top (and bottom) of the page.
A. For clarity during the design process, the grey border is there to show you the card edge / rim. The white border is the bleed area, the point where it will be cut off during production. Both borders will not appear on the finished products. Also, we advise you to put all important text and artwork within the red dotted line, known as the SAFE AREA (for more information please refer to next question).

A. If our online builder will not allow you to increase image size, it means that your uploaded image is at its maximum optimal size (going above will affect print quality).
If our system won't let you reduce image size, it means your image is already at its minimum optimal size (going below will produce empty spaces).
However, if your image is resizable, you can resize it from the image edit screen by moving the slider left or right.

A. Yes you can conveniently do this by clicking on the Sign-in to Facebook button
 on the right hand side of the online builder. Once you have signed-in to your Facebook account, you will have access to photos.
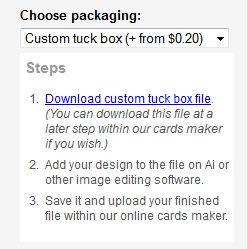
Choose the custom tuck box option under "Choose packaging" on product page. Download the correct box template (PDF) depending on the type of card stock you have chosen for your playing cards. If you are unsure which one is right for you, contact us and we can help you.

Open the file on your own computer to design the artwork and save your completed custom box file and upload it back to us within our online cards maker after you have customized your cards. (If you only need a custom tuck box without the cards, go to see here.)
We will check your files submitted to us for any problems and confirm the details with you. Images accepted: JPG, BMP, PNG, GIF, TIFF, EPS, PDF (Image resolution: Minimum 300 dpi). Reminder: Please add 3mm or 1/8" bleeding on all side and remove the black line before providing the box files.
There is no minimum order quantity required
See other FAQs